DIY Dye Macrame Wall Hanging
DIY Macrame
Macrame is my favorite craft. Most projects do not take much time, it can be so relaxing, and the possible creations are endless. There are even fun ways to mix arts with macrame. I'll show you one of those ways in this easy DIY macrame tutorial. We will first prepare our cord with a fun dip dye. Then we will make an easy wall hanging using just two kinds of knots!

If this is your first time doing macrame, I recommend just scrolling through the pictures first and then watching the video at the end. It's is really very easy, and having some visual primers will make it even more easy to learn!
If you want, you can even skip the dye portion and just do the macrame!
Do It Yourself Wall Hanging with a Dip Dye
Supplies Needed:
- 17 m of white/natural Macrame cord
- Fabric dye for cotton (I used Rit dye from Hobby Lobby in the colors Golden Sand, Tan, and Scarlet)
- optional: Fabric dye fixative (I again used Rit brand from Hobby Lobby)
- measuring tape
- scissors
- rubber bands
- boiling water, pinch of salt, and a drop of dish soap
- measuring spoons (that you don't mind getting dye on)
- ideally, gloves, stainless steel bowls, and stainless steel sink (though we didn't use any of those)
- clean towel that you don't mind if a little dye gets on
- garment rack
- S hooks
- 12" wooden dowel
Macrame Tutorial
- Cut a piece of cord 32 inches long

- Tie each end in an overhand or barrel knot (I did 10 cords with barrel knots and 10 cords with overhand, but it doesn't make that much of a difference.)

- Cut 19 more cords. Knot each end as you go.
- Divide cord into 4 groups of 5.

- Take one group and line up the ends, then fold in half.
- Repeat with the other 3 groups

- Take one group, fold in half, and tie a rubber band around the top. Try to make the loops slightly higher than the ends.

- Repeat with the 3 other groups.
- In a bowl, add 1.5 cups of boiling water, a pinch of salt, and a drop of dish soap.
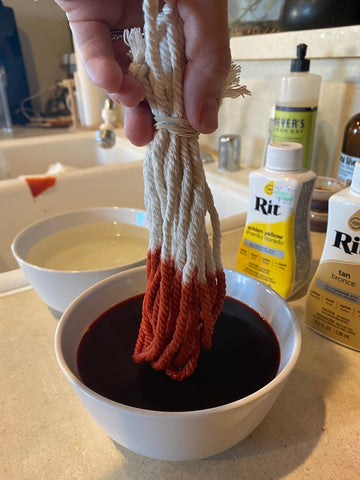
- Then add your preferred cotton fiber dye. I used Rit dye and tried two different color combinations over the course of two different projects. The first time I did 2 TBSP golden yellow, 1 TBSP scarlet, and 1 TBSP tan. The color was a deep beautiful purple scarlet. The second time I made this project, I changed the ratios and lowered the scarlet from 1 TBSP down to 1 TSP. (So my mixture was 2 TBSP golden yellow, 1 TBSP tan, and 1 TSP scarlet.) This time it came out like a warm dirt color. It reminded me of South Carolina soil. The cord in all the pictures is of the first dye project. The cord in the video below is from the second project.
- In a second bowl, add 1.5 cups of boiling water and a few TBSPs of dye fixative (optional).
- Working one bundle at a time, dip the middle section of your bundle into the dye. Dip a few times until you are satisfied with the saturation.


- Immediately dip into the fixative bowl.

- Once dunked about 10 ten times, rinse with very cold water until the water runs clean.

- Use an old clean towel and gently squeeze the bundle.

- Repeat for the rest of the bundles.
- Keeping each bundle separate, take the rubber bands off and let them hang dry.

- Once dry, take one cord from a section, half it, and attach it to the wooden dowel using a Lark's head knot or reverse Lark's head knot. Pictured is the Lark's Head knot, and in the video is pictured the reverse Lark's Head knot.

- Take another cord from another section and do the same.
- Take another cord from the 3rd section and do the same.
- Take another cord from the 4th section and do the same.
- Repeat this process, being sure to work in order of one cord per section until all the cords have been attached.
- You can be done at this point, or you can secure the cords further by tying a row of square knots.


-
Viola! You can hang your beautiful handmade wall hanging directly from the dowel using a thin wire nail.


And that's it!
Here is a video that will hopefully be somewhat helpful. I'm still learning how to film these projects, and I've learned that I need to get a microphone so the audio is more even. I hope to figure that out by the next video.
7 comments
Incredible work! I love the outcome and the step by step makes it easy to recreate.
This is gorgeous, had no idea it could be made at home!
Such a cool idea! I have this blank wall that I’ve been struggling to figure out what I wanna do with it! lol So this is a great idea for it!
Wow, this macrame DIY project looks lovely! The photos look great, too. Thanks for sharing!
This looks absolutely amazing!! Your directions are extremely helpful as well. I think I might try making one for myself soon :) Thanks so much for sharing this!!
This is such beautiful work! Really nice job! I love it!
It looks beautifully complex, but surprisingly so easy to make with all the directions.
