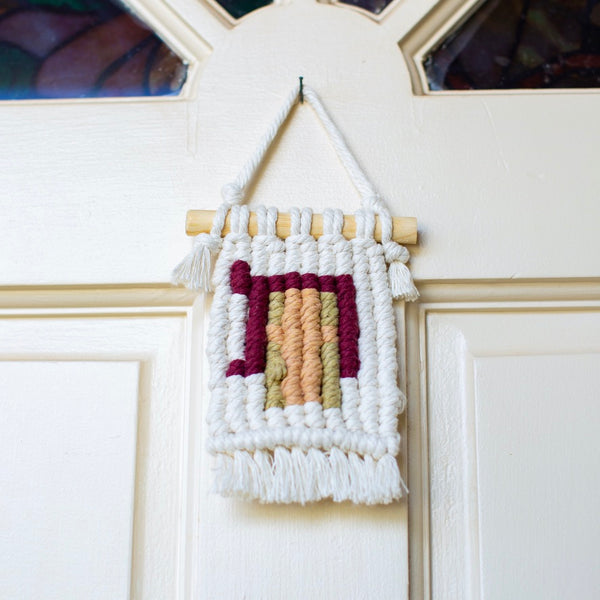
DIY Macrame Wall Hanging
A DIY macrame wall hanging using just 2 types of knots! With just a few macrame supplies, you can make an adorable macrame wall hanging. Grab a few friends and get crafty! You’re not sure how to make macrame? Don’t worry, I’ve got you covered with instructions, pictures, and a video!

For this project, I wanted to use simple knots so that anyone could make, even if you are new to macrame. Now there are many different kinds of knots you can use in your projects, but the two we are using today are the Lark's Head knot and the square knot. The square knot is very basic and easy to learn, and OMGSH you can make SO many things using this knot! Our logo even features this knot, we love and use it THAT much!

Section: What Macrame Supplies You Need
This macrame wall hanging how-to is so easy, and you're only going to need a few simple tools and materials! Grab a latte or water kefir (had to throw this in, my new favorite fermented at-home drink).
Gather together the following supplies:
-
One macrame dowel (we used our Fringe and Free dowel, and cut it in half with a handsaw)
-
16 m macrame cord, cut into 10 strands that are 5' long each. I highly recommend our brand which is made from 100% soft cotton, affordable, and available in 10 colors!
-
Scissors
-
Garment rack or something to hang your dowel from
-
measuring tape
Section: How To Make This Macrame Wall Hanging
Be patient and get a good understanding of the square knot. I have step-by-step instructions with many pictures. I also made a video that you can watch and learn from. The key is to go slow and let your mind wrap itself around the square knot. Once you get it down, you will be speeding through your next macrame project.
How to make macrame wall hanging:
- Cut 10 pieces of macrame cord 5 feet long each.

- Take a cord, find the center and make a loop.

- Attached it to the dowel with a Lark’s head knot.

- Add the remaining cords the same way.

- Take the first 4 strands and make a square knot.

- Keep going down the row and tie 4 more square knots.

- Skipping the first two strands, make a row of 4 square knots.

- Skipping the first 4 strands, tie a row of 3 square knots.

- Continue pattern, tie a row of 2 knots.

- Tie a row with just 1 knot.

- Now we will make an entire diamond of square knots. The next row will have 2 knots.

- The following 3, the next 4, and then 5.

- After that it will go back down to 4, 3, 2, and then the final 1.

- Next we just trim. Take the center two strands and measure about 5 inches down and trim.

- Make your fingers parallel to the angle of the diamond and trim the strands on each side. Or just measure 5 inches down from each last square knot.
- Know we will make the string to hang the piece from. Take the longest cord from the ends you just trimmed. If it’s a 4-ply or 3-play cord, unravel the cord and take just one of the strands.

- Tie one end of the strand to one end of the dowel.

- Make the string whichever length you want and tie the remaining end to the other end of the dowel. Trim and excess string.

- Optional: I like to unravel each strand halfway up for more texture.
 .
.
Here is a video of how to make the macrame wall hanging:
Section: Tips To Remember With Your DIY Macrame Wall Hanging
There are so many ways you can customize your macrame wall hanging and make it your own. For example, you could use different colors of macrame cord, use wooden beads, and play around with texture.
There are two ways to hang this wall hanging, either from the dowel itself or from a string that you can attach. You pick!
It's also fun to play with texture at the end of your wall hanging. Consider these fun texture options:
-
unravel the ends halfway
-
unravel it all the way up,
-
unravel and then brush the macrame cord out with a clean pet brush and get LOTS of soft volume
You can make this in any color you want, and even add multiple colors to your hanging. Consider adding three complementary colors (that I will reference as colors A, B, and C) like this:
-
2 strands of color A, 2 strands of color B, 2 strands of color C, 2 strands of color B, and then 2 strands of color A again.
-
That may sound complicated, but it's just an ABCBA pattern that will give a fun symmetrical pop of color!
Finally, consider dip dying your macrame wall hanging into a fabric dye!
Takeaway: Making your own macrame wall hanging is an easy craft project that you can enjoy (just be patient with yourself)
This beginner macrame wall hanging is a simple but stunning way to add handmade fiber art to your walls. But if you would rather have one already made, we'd love to make it for you! We've named this particular style the Danielle in our online shop.
I hope you like to make these for gifts and for yourself. I'd love to share more complex patterns once you master this general concept of a wall hanging and the square knot! Don't forget to check out our online macrame supply shop! We'd love your support.
Do you want to read more about dip-dying macrame cord? Check out this DIY Dip Dye Macrame Wall Hanging tutorial!
6 comments
These look so nice! Love how you explained each step, it doesn’t seem overwhelming.
I LOVE this! Such a great step by step with all of your photos. Macrame is so fun too, definitely want to give this a try.
It looks so nice, I will create my first macrame now :)
thank you
I’ve never tried macrame, and I’m not a very crafty person, but you have provided very clear instructions and they are so easy to follow! I think I would actually try this some day!
I love reading your DIY posts! They always look so great and you always make it so easy to follow along and understand. Thank you :)
This looks fun and not difficult after you get the hang of it.
It would look really cool as a headboard. Maybe have fun with it combining white and blue?
I would try that.